Chocolate Almond Balls – No-Bake, Real Dark Chocolate
No-bake chocolate almond balls made with almonds, cashews, pitted dates, and vanilla, finished with dark chocolate. No oven, no coconut oil, no almond flour. Ready in 15 minutes with a food processor.
Would you like to save this recipe?
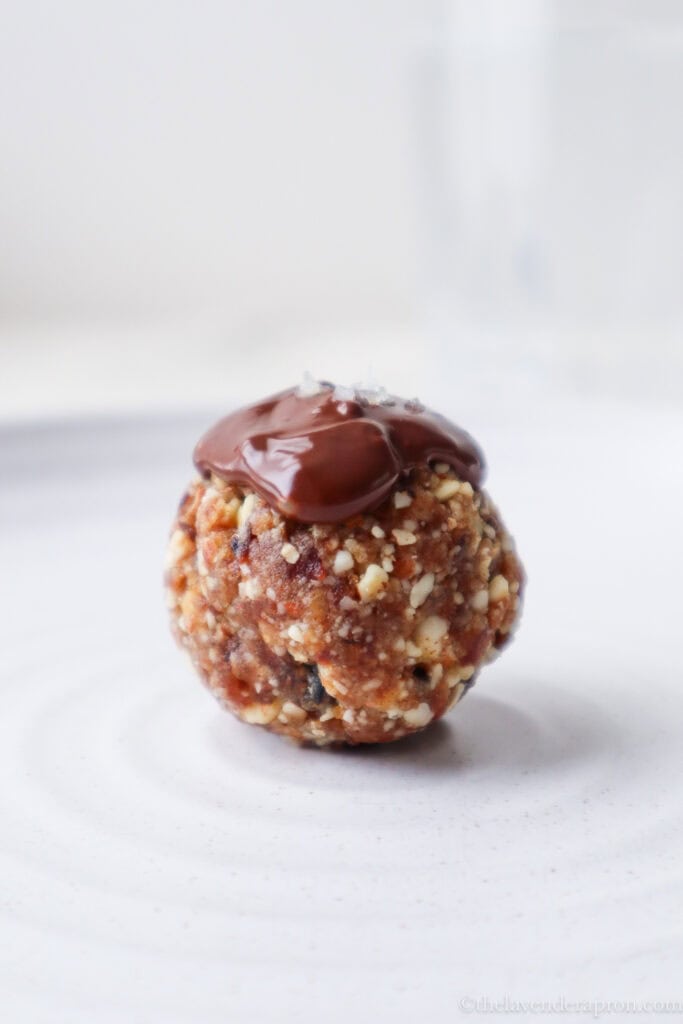
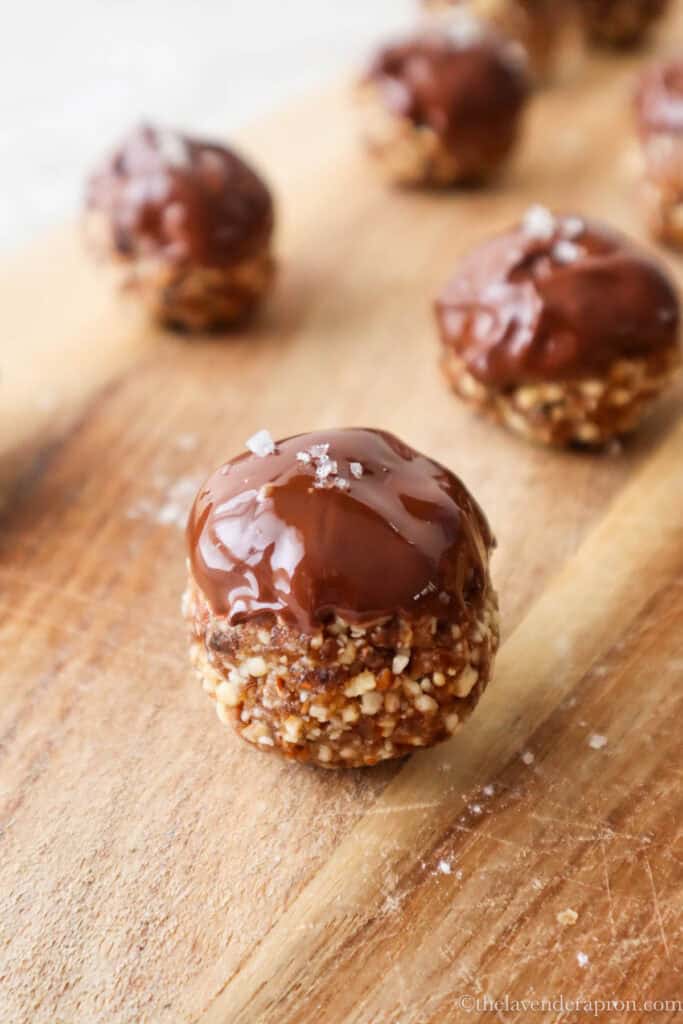
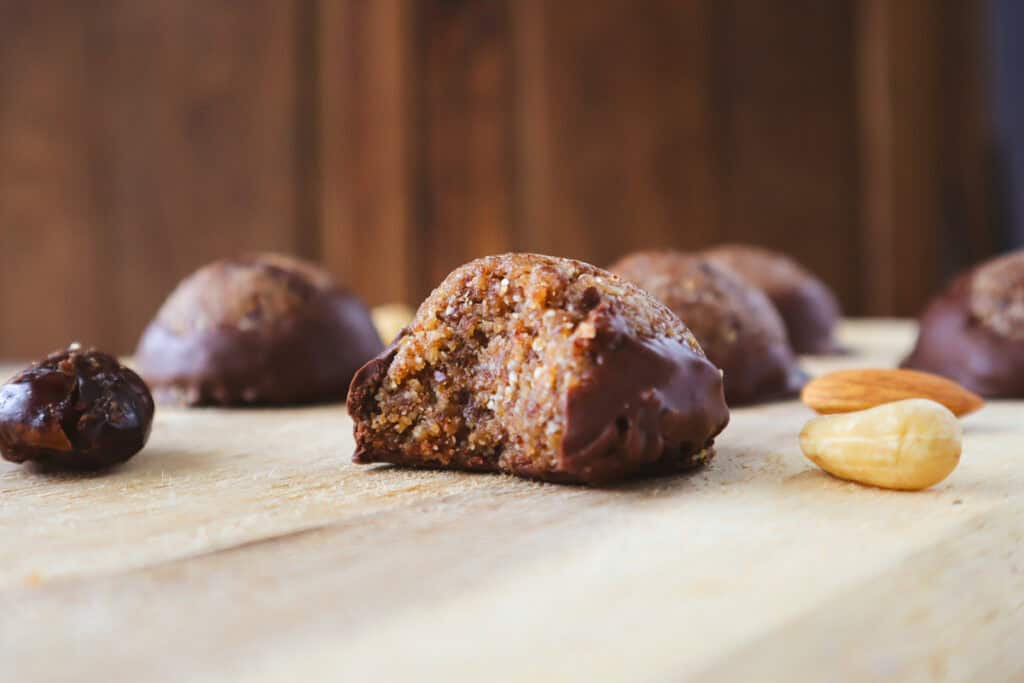
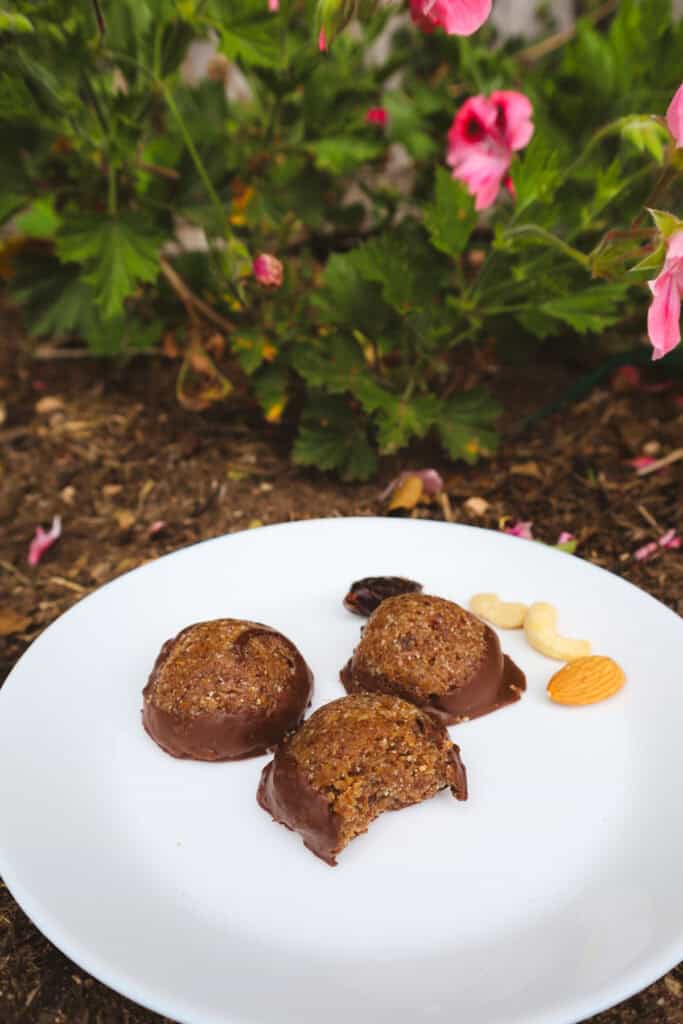
These almond chocolate balls have a smooth dark chocolate topping that gives way to a dense, chewy interior – nutty, fudgy, naturally sweet from dates, with a hint of vanilla. Think brownie texture, not paste. Each ball delivers contrast: chocolate first, nuts next, natural sweetness last.
I have been cooking French and European home recipes for over fifteen years, first in Strasbourg and Paris, and I hold a Certificate in Plant-Based Pâtisserie from Le Cordon Bleu. I test every recipe in my real kitchen and my family gives me honest feedback. These stayed.
This post may contain Amazon affiliate links. As an Amazon Associate I earn from qualifying purchases, at no extra cost to you.
I make them as our quatre heures, the French afternoon habit of something homemade instead of something from a packet. One batch on Sunday, snacks sorted for the week.
Each ball has about 3 grams of protein, so a couple make a genuinely satisfying snack. They keep in the fridge for about a week and freeze beautifully, which means you can always have something good on hand without much effort.
Chocolate Almond Balls Recipe overview:
- Flavour: Smooth, crisp dark chocolate topping, then dense and fudgy with almonds, dates, vanilla, and a hint of creaminess from the cashews
- Prep time: 15 minutes | Chill time: 15 to 20 minutes (optional)
- Yield: 16 balls | Equipment: Food processor or high speed blender
- Dietary: Vegan (with vegan chocolate) · gluten-free · dairy-free
Why These Work Differently to Most Bliss Ball Recipes
Most recipes blend everything in at once – nuts, dates, cocoa, nut butter – into one uniform paste. Fine, but everything ends up tasting like everything else.
The order of processing matters here. Nuts go in first, on their own, so you get fine, even pieces throughout the dough rather than big chunks or paste. Dates go in separately and bind without breaking the nuts down further. Real texture, not chunky, not paste.
Real chocolate, not cocoa powder. I tested versions with cocoa powder mixed into the dough. The difference is a bit like dusting cocoa over ice cream versus pouring chocolate sauce over it. Dipping in melted chocolate gives you a proper hit with every bite. That first crack through the top coating is the whole point. Think of it like a Florentine: contrasting layers, not everything blended into one.
Why cashews specifically? My Le Cordon Bleu training covered something that stuck with me: fat absorbs and preserves flavour, and during eating it coats the tongue and allows flavours to linger. Cashews are rich in unsaturated fats (particularly oleic acid), which are liquid at room temperature. That’s why they blend into a smooth, creamy texture rather than a dry crumb, and why the chocolate and vanilla taste more present in every bite than they would with almonds alone. No butter, no oil, no nut butter needed. The cashews do that work.
A note on fresh nuts. Because of their high fat content, nuts are vulnerable to rancidity. The fat oxidises when exposed to air, light, or moisture, and once that happens there is no saving the batch. Always check the date on your almonds and cashews before you start. Rancid nuts have a sharp, bitter, almost paint-like smell. If in doubt, taste one raw. It should taste clean and mild.
Ingredients for the almond chocolate ball recipe
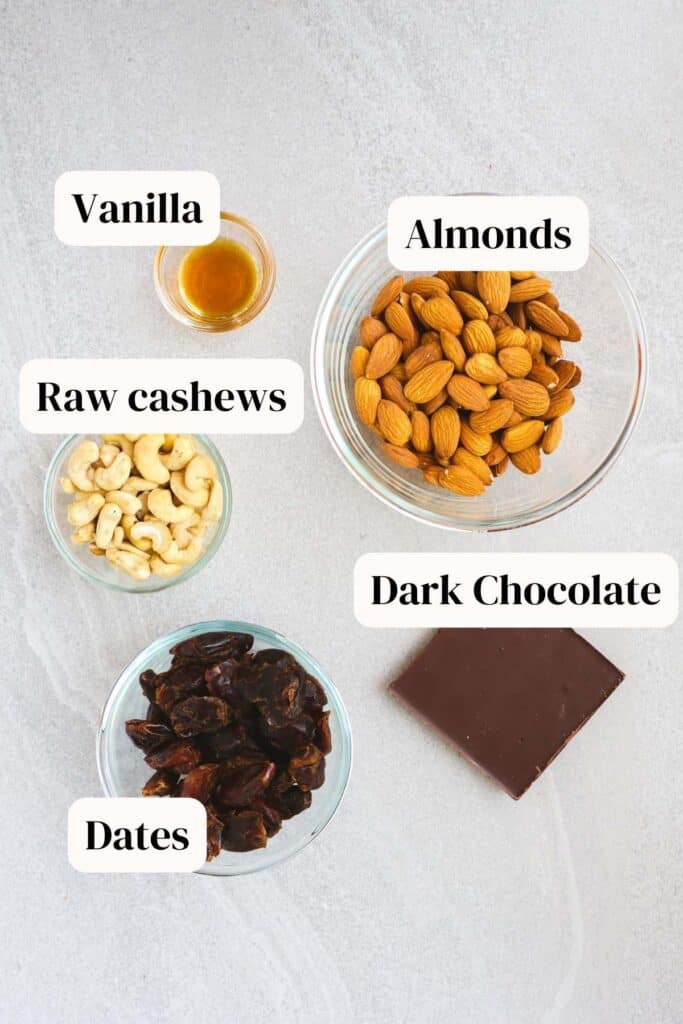
- Raw Almonds: The base of the dough. Good flavour, dense texture.
- Raw Cashews: What makes these noticeably creamier than a basic almond ball. Their natural fat content gives the dough its richness without any added butter or oil. Raw works best; roasted changes the flavour profile.
- Dates: The sweetener and the binder. I use regular pitted dates from the supermarket. Medjool dates blend a little more easily but cost more and are not necessary. Make sure your dates are at room temperature and feel soft before you start. Cold or hard dates are the most common reason the mixture doesn’t come together.
- Vanilla extract: Ties everything together. You can leave it out, but it makes a real difference.
- Dark Chocolate: For dipping or drizzling over the almond date energy balls. The first taste in every bite, so use one you actually enjoy eating. 70% or higher gives a clean snap.
- Water: 2 tablespoons, in the recipe card. The dough usually comes together without it, but having it measured out means you are not guessing if the mixture looks dry.
No almond flour. No coconut oil. No maple syrup. No protein powder.
A Note on Dates: This Matters More Than You’d Think
It is worth taking a quick look at your dates before you start. Most supermarket dates have been oven-dried rather than sun-dried, and many are treated with glucose syrup to extend shelf life and improve appearance. A natural date should feel genuinely soft, with a slightly matte skin. If your dates look very shiny, they have likely been syrup-treated and may not bind the dough properly.
If your dates feel hard or dry regardless, soak them in hot water for 10 minutes, drain, and pat completely dry before using.
Substitutions and Additions
- No cashews? Replace with more almonds. Not quite as creamy, but still good.
- Why no oats, coconut, or protein powder? Oats dilute the nut flavour and make the balls drier. Coconut tends to overpower the chocolate. Protein powder dulls the chocolate taste and changes the texture. Fewer ingredients, stronger flavour.
- For a chocolate interior too: Add 1 tablespoon of cocoa powder into the processor with the dates, or roll the finished balls in cocoa powder for a truffle finish. Both work well.
- Chocolate peanut butter version: Stir 2 tablespoons of peanut butter into the dough before shaping.
- White or milk chocolate works well if you are making a big batch for sharing.
- Want to add coconut? Stir in ¼ cup of shredded coconut for extra texture and a little more sweetness.
- Dough too dry? Add water one tablespoon at a time. Too wet? Add a few more nuts.
- Want bars instead of balls? Press the dough into a lined 20cm x 20cm tin, refrigerate for one hour, cut into bars, and drizzle with chocolate. Saves all the rolling time and looks great on a board.
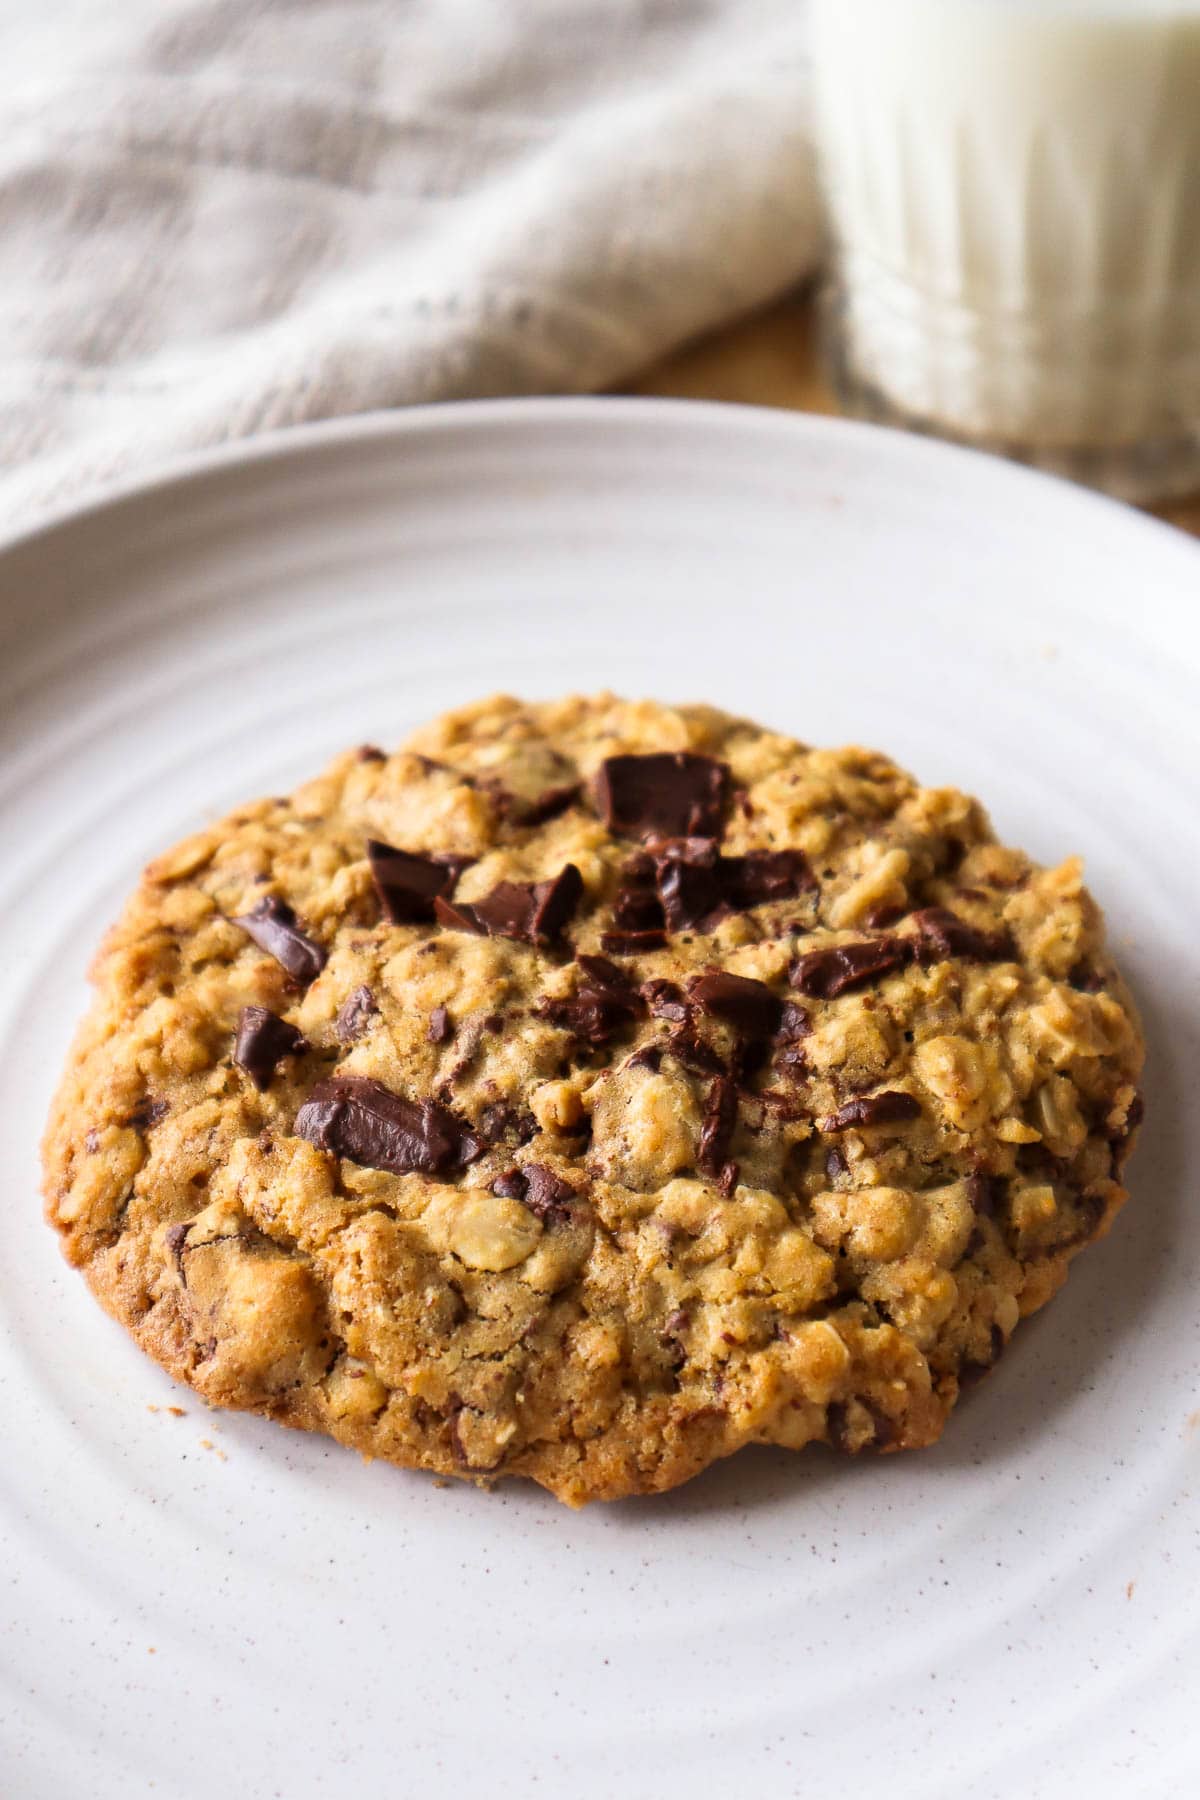
If you like this almond chocolate balls recipe, I have a simple cashew lemon ball recipe and matcha energy balls recipe that you can make in 10 minutes or less. And for something slightly more decadent, I have a white chocolate cashew ball recipe that tastes like those Raffaello truffles. Of you are looking for more desserts, try my oatmeal chocolate chip cookies made without brown sugar 😀
How to Make Chocolate Date Almond Balls
Full instructions are in the recipe card below.

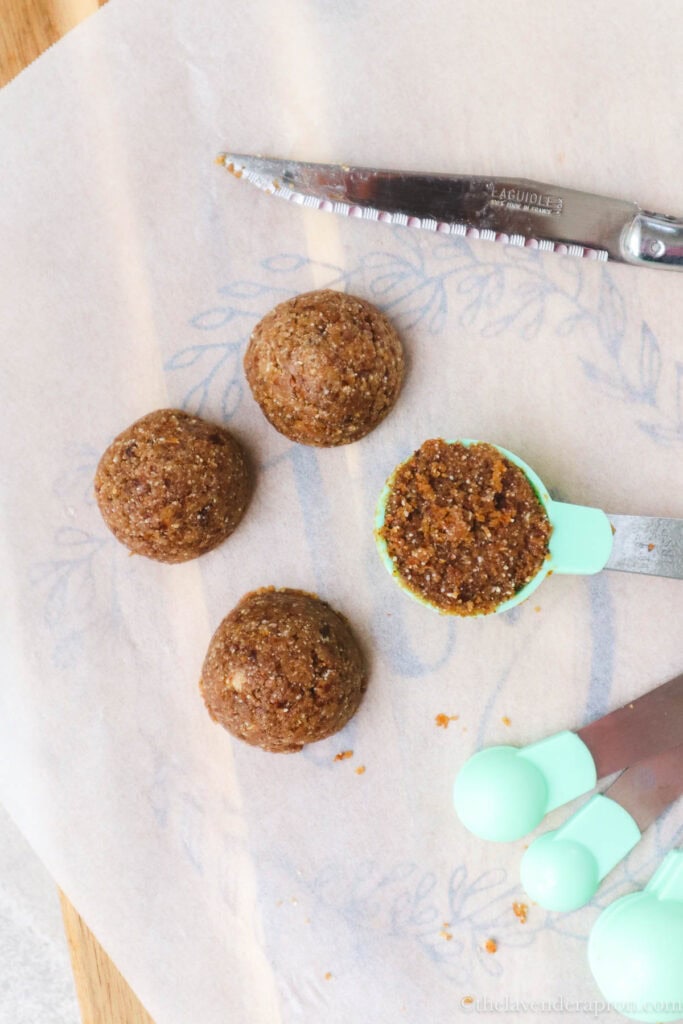
1. Process the cashews and almonds. Add cashews and almonds to the food processor. Pulse until finely ground. You are aiming for coarse sand with a few larger bits, just starting to clump at the bottom of the bowl. Stop here. If you keep going, the oils release and you end up with nut butter instead of dough.

2. Add dates and vanilla. Process until the mixture forms a sticky, cohesive dough. Press a small amount between your fingers — if it holds together, you are ready. If it crumbles, give it another 10 seconds and try again.
3. Make the balls. You can either lightly wet your palms before rolling or use a measuring spoon. If using your hands, the dough warms up quickly as you work, and damp hands stop it sticking to your palms. If using a measuring spoon, press the mixture in firmly and ease it out with a small knife for a neat half-moon shape.
Either way, once the balls are on the parchment-lined baking sheet, give each one a light press so it has a small flat base. This stops them from rolling around when you spoon chocolate on top, a small thing that makes the whole process easier and neater.
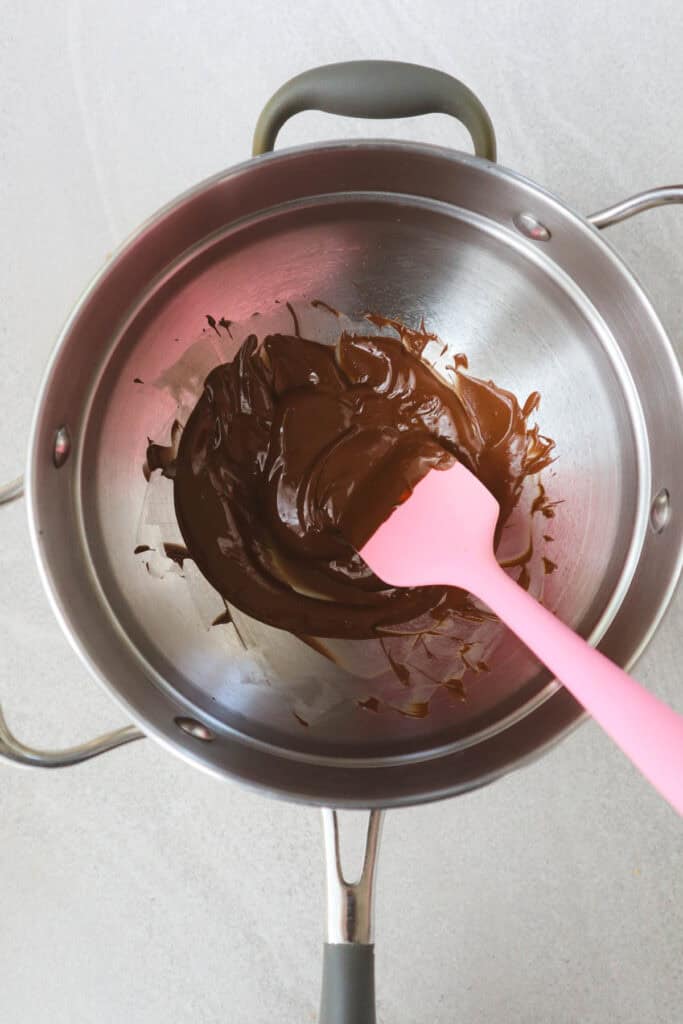
4. Melt the chocolate. Chop into small, even pieces. Melt in a double boiler over a gentle simmer, stirring until smooth. Or microwave in 15-second bursts, stirring between each. Keep everything completely dry. A single drop of water will cause the chocolate to seize.
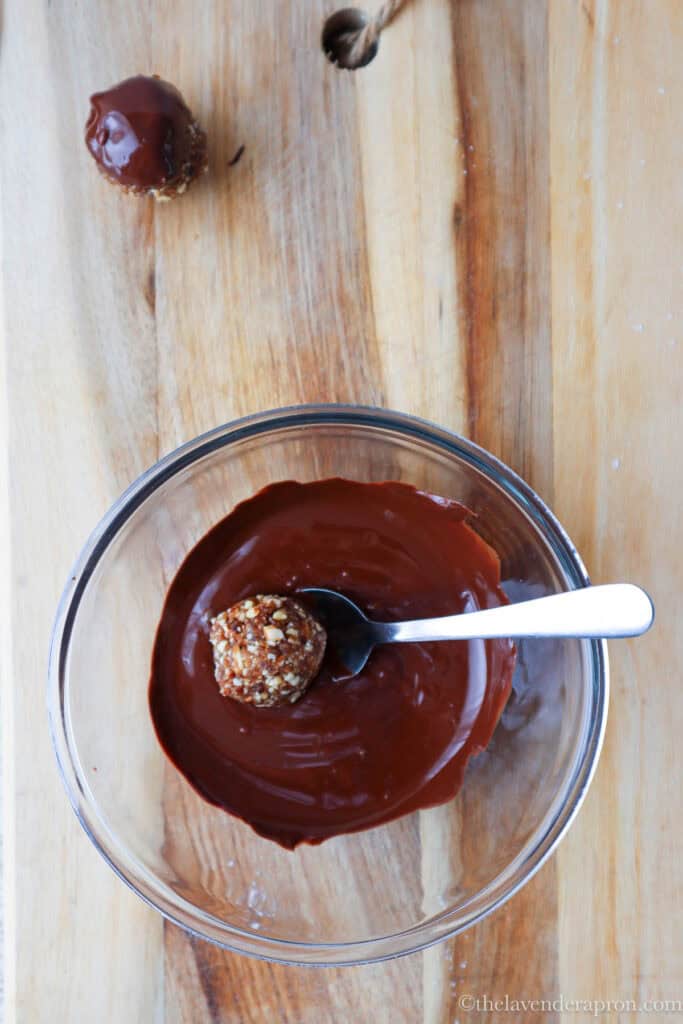
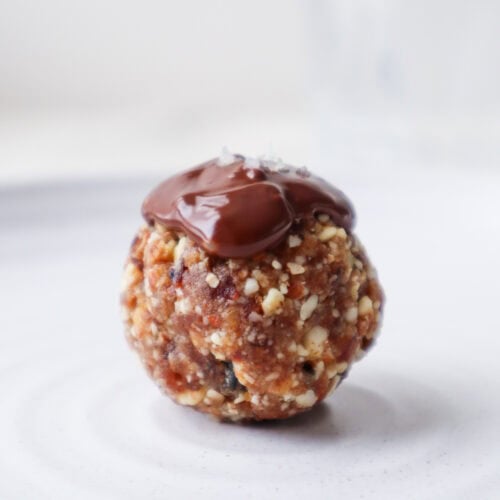
5. Finish with chocolate. Spoon a little chocolate (or a lot) over the flat top of each ball, or dip the top or the base and lift out with a fork or spoon.
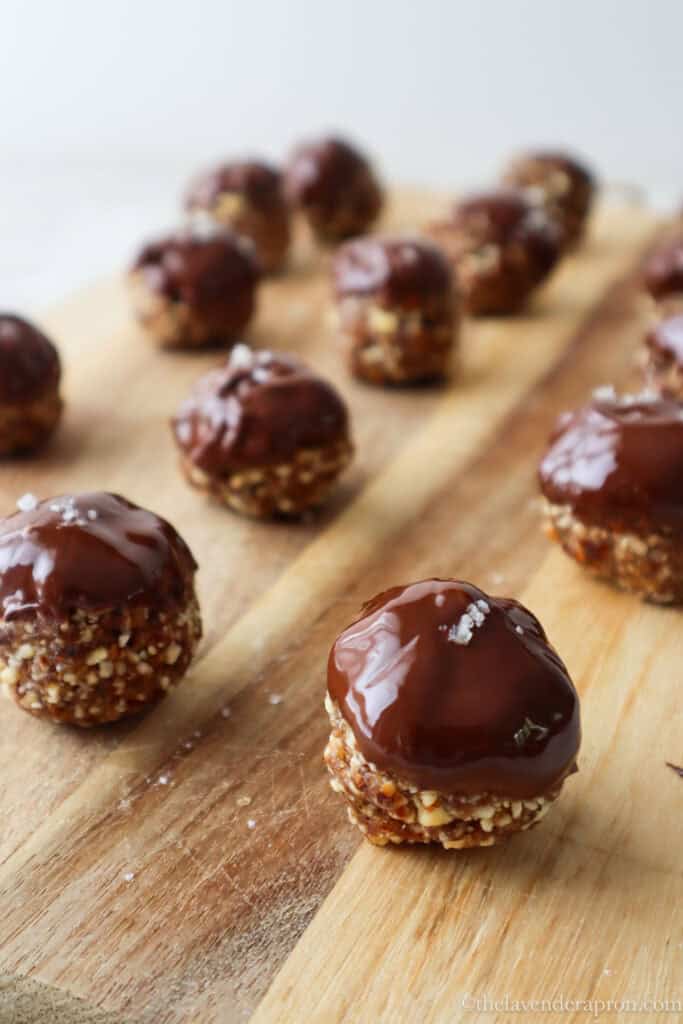
6. Add a small pinch of fleur de sel before the chocolate sets if you like.
The One Thing That Goes Wrong
Almost every problem comes down to timing in the food processor.
Too little processing and the mixture stays crumbly and won’t hold together. Too much and the oils release, leaving you with a greasy, heavy dough that can’t be saved. You are looking for a texture that resembles coarse sand and just begins to clump. Once you know what that looks and feels like, you will never struggle with these again.
Variations:
Make a half moon shape with a pretty chocolate base. I do this if I want to make them look a bit fancy. Use a cookie dough scooper or measuring spoon (if they look like a half moon) and use a pointy knife to gently lift them out of the scoop. It is a bit fiddly, but it looks very pretty 🙂
Notes and Tips
- Damp hands when rolling. Lightly wet your palms before you start. The dough warms up quickly and this makes a real difference.
- Keep water away from the chocolate. Dry your bowl, spoon, and hands completely before melting. Any moisture causes it to seize immediately.
- Eat them straight from the freezer. The chocolate topping firms up beautifully when cold and the texture becomes almost fudge-like. On a warm afternoon, this is genuinely the best way to eat these chocolate almond bliss balls. It’s not just a storage option.
- Three ways to finish them. Plain with no chocolate for speed, dipped on the base for a clean shell, or a spoonful smoothed on top with a pinch of fleur de sel. The dark chocolate top with a pinch of fleur de sel is what gives these their café-style finish. It’s the kind of thing that makes it look like it came from a good coffee shop but takes about two minutes.”
When to Eat Them
Each ball has around 3 grams of protein, 3 grams of fibre, and 132 calories. The only added sugar comes from the dark chocolate. There is no refined sugar in the dough itself, just the natural sweetness of dates.
Dates provide fast-releasing natural energy alongside the slow-burn satiety from the cashew and almond fats, which is why two of these at four in the afternoon actually holds you until dinner.
In France the afternoon snack has a name: le quatre heures. The habit is homemade over packaged, something small that makes the day feel more considered. These fit that idea exactly. You can read more about how the French eat here.

Storage
- Fridge: airtight container, up to one week.
- Freezer: spread on a parchment-lined baking sheet for one hour first so they don’t stick together, then transfer to a freezer-safe container for up to two months. They are excellent straight from the freezer. The chocolate shell firms up and the texture becomes almost fudge-like. Leave them out for 15 minutes if you prefer them soft.
Just different names for the same thing. All three refer to no-bake snack balls made from nuts or oats bound together with dates or nut butter. The name tends to vary by region.
Almost always a date problem. If your dates are hard, soak them in hot water for 10 minutes, drain, and pat dry. If they came straight from the fridge, leave them out for 20 minutes first. Cold or dry dates are the most common culprit. Also check the skin. If your dates look very shiny, they may have been coated in glucose syrup, which affects how they bind. Matte skin, soft texture: those are the dates you want.
Not really. You need one to grind the nuts finely enough. A high-speed blender like a Vitamix or Thermomix works well too, but chopping by hand won’t give you the right texture.
No. Regular pitted dates from the supermarket work perfectly. Medjool dates blend a little more easily, but they are not worth the extra cost here.
Water got into it. Even a small drop causes chocolate to seize. Make sure your bowl, spoon, and hands are completely dry before you start melting.
Is this chocolate almond balls recipe gluten-free and vegan?
Yes to both, as long as you use vegan dark chocolate. Most 70% dark chocolate is dairy-free, but check the label.
Yes. Press the dough into a lined 20cm x 20cm tin, refrigerate for one hour, cut into bars, and drizzle with chocolate.
I have not tested it, but one to two tablespoons of vanilla protein powder could work. Protein powder absorbs moisture quickly, so you will likely need to add a little extra water. Try the chocolate almond balls recipe as written first. At 3 grams of protein per ball, they are genuinely satisfying already.
Yes. Roll the finished balls in cocoa powder for a truffle-style finish. It works well, but dipping in real chocolate gives a stronger flavour hit and a far better texture contrast.
Would you like to save this recipe?
Easy Chocolate Almond Balls (No-Bake, No Coconut)
Equipment
- Food processor
- 1 Double boiler Or microwave safe bowl
Ingredients
- 1/2 cup raw cashews (70 grams)
- 1 1/2 cups raw almonds (210 grams)
- 1 1/4 cup pitted dates (225 grams)
- 1 teaspoon vanilla extract
- 3 oz dark good quality chocolate (69 grams) or you can use white or milk chocolate
- 2 tbsp water
Instructions
- Process the cashews and almonds. Add cashews and almonds to the food processor. Pulse until finely ground. You are aiming for coarse sand with a few larger bits, just starting to clump at the bottom of the bowl. Stop here. If you keep going, the oils release and you end up with nut butter instead of dough.
- Add dates and vanilla. Process until the mixture forms a sticky, cohesive dough. Press a small amount between your fingers — if it holds together, you are ready. If it crumbles, give it another 10 seconds and try again.
- Make the balls. You can either lightly wet your palms before rolling or use a measuring spoon to make a dome shape. I used a measuring tablespoon to make about 20 balls. If using your hands, the dough warms up quickly as you work, and damp hands stop it sticking to your palms. If using a measuring spoon, press the mixture in firmly and ease it out with a small knife for a neat half-moon shape. Either way, once the balls are on the parchment-lined baking sheet, give each one a light press. This stops them from rolling around when you spoon chocolate on top, a small thing that makes the whole process easier and neater.
- Melt the chocolate. Chop into small, even pieces. Melt in a double boiler over a gentle simmer, stirring until smooth. Or microwave in 15-second bursts, stirring between each. Keep everything completely dry. A single drop of water will cause the chocolate to seize.
- Finish with chocolate. Spoon a little chocolate (or alot) over the flat top of each ball, or dip the top or the base and lift out with a fork or spoon.
- Add a small pinch of fleur de sel before the chocolate sets if you like.
Notes
Nutrition
More Recipes You Might Like
More bliss balls and energy bites:
- Lemon Cashew Balls — ready in 10 minutes, no coconut oil
- Matcha Energy Balls with Pistachios — no dates, a completely different flavour
Make-ahead snacks:
- Blueberry Cottage Cheese Muffins — great lunchbox option
- Banana and Raspberry Muffins — lemon drizzle, not too sweet
- Maple Roasted Nuts — air fryer or oven, ready in minutes
Not-too-sweet cookies: